It was early spring, and I had just moved into a new house—tiny, but with a great big yard for a garden. The landlord had spent years landscaping, with fruit trees, native shrubs, and perennial grasses along the fence line—I was lucky. In the middle of the yard was a 15 ft x 15 ft plot of dirt, a blank canvas for my summer. Sure, this was a rental, but I was eager to dig in the dirt and grow organic veggies in this rural town with meager grocery stores.
It looked like the house had once been a garage, one likely built during the era of lead-based paints. So, I had no idea what was lurking in the thin, sandy soil. Aware that my crops would be pulling nutrients (and possibly toxins) from that soil, I decided to test the soil before planting. I hoped this would reveal anything to be concerned about, while guiding me on how to make the soil a more hospitable place for my garden. If you have any reason to suspect contaminants in your soil, you should get it tested.
Most of us don’t know the entire history of our homes and the land they’re built on. And, renters likely know even less. In some cases, your yard may have had uses in the past that make it unfit for growing food altogether. Or, there could have been potentially polluting industry near your home and garden in the past.
If you have any question, it’s best to test.
Even in my rural location, I was able to find a local agricultural extension office for the state university—which is in a city over 200 miles away. That’s to say that no matter where you live, help is nearby. I got the soil testing kit from this local office; the kit consisted of a simple plastic tube and some instructions. You can also contact the university or lab directly to have a kit mailed to you. In some cases, even a large ziplock will do for collecting soil—it depends on the lab.
While you may be able to find test kits online or at local garden and hardware stores, we suggest going through a local university to ensure the tests are conducted in professional labs. And the professional, scientific advice you’ll get back with your results can make all the difference in a healthy yard or garden. You can find the contact info for your nearest office here.
Early spring is a great time of year to test your soil. It’s best to do it when the ground is thawed and digging won’t disturb growing plants. But really, you can a sample just about any day of the year.
When you’re testing your soil, be sure to follow the instructions, as each lab has a different process that should be followed for the best results (here’s an example from my kit). In my case, the sample really consisted of a composite of smaller soil samples from different parts of my garden. I chose several locations, dug six inches down for the sample, mixed the soils together, let them dry, and filled the tube. Many kits, including mine, include a questionnaire for the lab to better understand the past, current, and future uses of the soil.
The questionnaire is also usually where you tell the lab what to test for. I requested the routine garden test, which looks specifically at fertility (including pH, organic matter, nitrates, phosphorous, potassium, zinc, iron, copper, and many others). A routine test is often sufficient, unless you have specific concerns about your soil. Because I was planning to grow a Climate Victory Garden, I was also curious to know the soil carbon levels, with the hopes of sequestering more carbon in my garden as time went on—so, I added that test.
If you’re concerned about toxins in your garden, you should get your soil tested. Many labs offer inexpensive add-on tests for heavy metals like lead, cadmium, molybdenum, or chromium (these are especially recommended if you live near a mining site or if biosolids like sewage sludge may have been used on or near your property). Pesticides are tougher to test for and often much more expensive to measure, but some labs do offer these tests, so reach out to them if you have specific concerns. You may also contact the National Pesticide Information Center to find more detailed information and contact information for local experts.
For me, the soil collection and paperwork took me less than an hour. The two tests cost less than $50 (including shipping). A good investment in my books! Especially considering all the professional advice that came with the results. Not to mention the healthy food I’d be eating from my garden in no time.
Drop the soil and paperwork into the mail and wait for a response. Or, if you’re lucky enough to have a lab in your community, you can drop it off in person. And, incredibly, many labs will return your test results within a week. This depends on how many tests you ask for and how you receive your results—email being the fastest option.
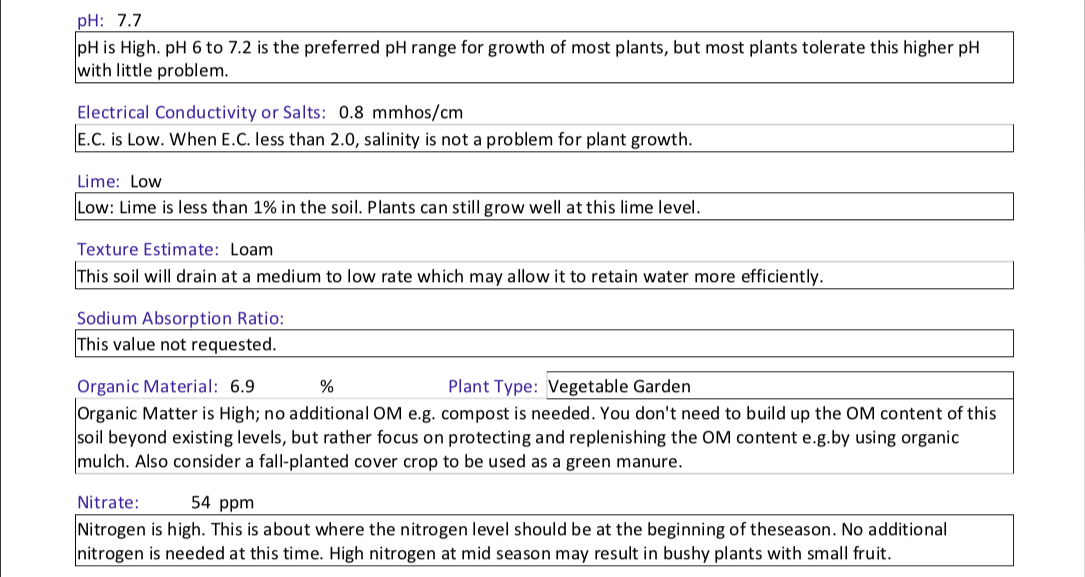
My results listed the elements tested, the amounts found in my soil, and suggestions on how to improve.
Next it was time to amend, heal, and build my soil for a strong gardening foundation. Some of this was easily done by simply adding lacking elements, while others will take several seasons to correct. Give yourself time to incorporate the test’s recommendations; it can take time to balance these elements before your soil is ready to be planted in. Often, labs provide contact information for follow up questions.
In the meantime, if your soil proves to be safe, you can still grow food. Some plants thrive in soils with higher or lower nutrients or pH levels than others. In fact, some food crops can even help you improve your soils—for example, legumes like beans and peas can help your soil become more nitrogen rich, if that’s the element it’s lacking.
Soil testing is a great way to ensure you’re setting yourself up for success in the garden. Knowledge is power, and healthy soils have the incredible potential to feed your family, beautify your community, and fight climate change.